How to Use AI to Fix a Photo Without Editing Skills
If your photo is blurry, dull, or just doesn’t look right, AI can fix it in seconds. You don’t need Photoshop, and you definitely don’t need editing experience. Most AI photo editors today work with one click. You upload your image, tap enhance, and the tool does the heavy work for you.
That’s really the idea behind using AI to fix a photo. It studies your image, detects problems like blur or poor lighting, and automatically improves it. And honestly, some of these tools are surprisingly good, even the free ones.
Let me walk you through how it actually works and what you should use.
What AI actually does when it fixes your photo
AI is not just adding filters. It’s analyzing your image like a human editor would, but much faster.
Here’s what happens behind the scenes:
- It sharpens blurry details
- It removes noise and grain
- It fixes colors and brightness
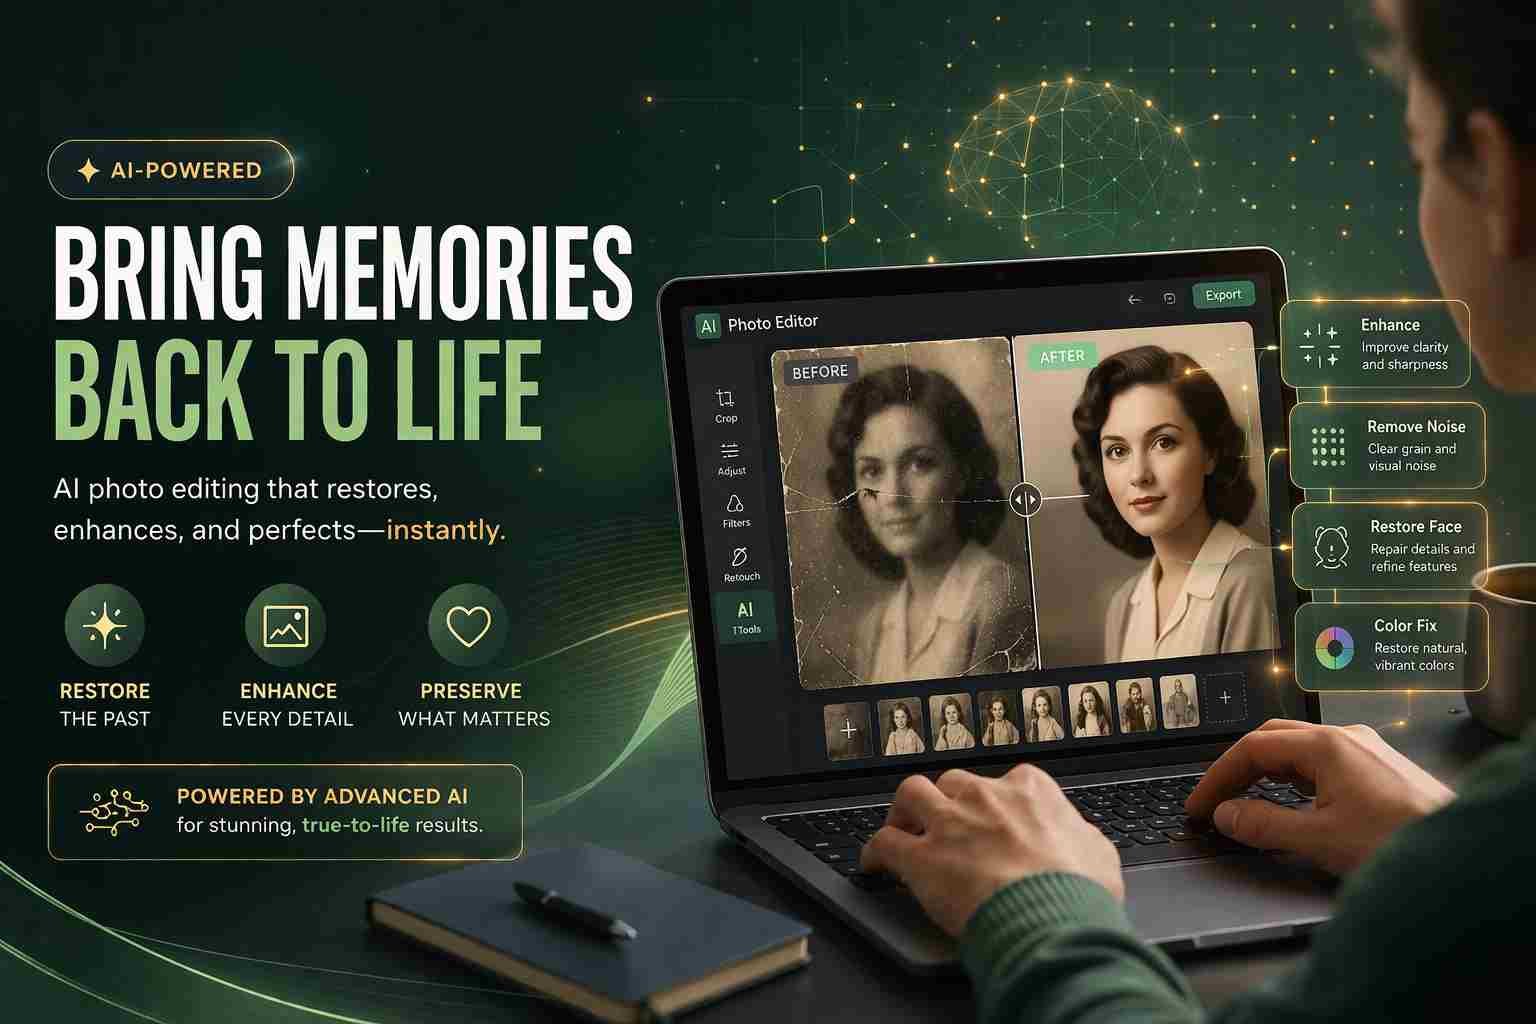
- It restores faces in old or low-quality images
- It can even remove unwanted objects
For example, if you upload an old family photo, AI can clean it up, make faces clearer, and bring back natural colors. If it’s a dark selfie, AI adjusts lighting automatically.
The interesting part is that it learns from millions of images. That’s why results often feel natural instead of edited.
The easiest way to fix a photo using AI tools
You don’t need a tutorial. The flow is simple.
Start by opening any AI photo editor online. Most of them work in your browser, so no installation needed.
Upload your photo. Once it loads, you’ll usually see options like enhance, sharpen, or restore. Click one of those, and within a few seconds, the tool will process your image.
Now compare the before and after. If it looks good, download it. If not, try another option like color fix or face enhancement.
That’s it. No layers, no manual adjustments.
Best free AI photo editor tools you can try right now
There are a lot of tools out there, but not all are worth your time. Here are the ones that actually work well.
Remini
Best for face enhancement. If your image is blurry or pixelated, this tool can make faces look clear again.
Canva AI Photo Editor
Great for beginners. It has simple enhance options plus background removal and object cleanup.
Fotor AI
Balanced tool. Good for lighting fixes, sharpening, and general improvement.
Pixlr AI Editor
Works directly in browser. Fast and lightweight with useful auto-enhance features.
Google Photos AI
If you’re on Android, this is already in your phone. Features like Magic Eraser and Enhance can fix photos instantly.
If you just want a quick fix, Canva or Google Photos is usually enough. If your image is damaged or blurry, Remini is stronger.
Can Google AI photo editor really improve your images
Yes, and this is something many people ignore.
Google Photos has built-in AI tools that can do things like:
- Remove unwanted objects using Magic Eraser
- Enhance lighting and sharpness automatically
- Fix blur in supported devices
- Improve portraits with face tuning
The best part is it’s already integrated into Android phones. No need to search for extra apps.
But here’s the thing. It works best for everyday photos. If your image is very old or extremely low quality, third-party tools like Remini might do a better job.
AI photo generator vs AI photo editor what’s the difference
This confuses a lot of people.
An AI photo editor improves your real photo. It fixes problems like blur, lighting, or damage.
An AI photo generator creates a completely new image from text. You type something, and it generates a picture.
So if you want to fix your selfie, you need an editor. If you want to create a fantasy image, then you use a generator.
Simple as that.
What works best for blurry old or damaged photos
Not all tools handle old photos the same way.
If your image is:
- Blurry → use Remini or Fotor sharpen
- Old faded photo → use AI color restore tools
- Low resolution WhatsApp image → use upscale or enhance feature
- Damaged or scratched → use AI restoration tools
Here’s the part most people miss. Don’t expect magic from one click every time. Try two or three tools and compare results. Some tools handle faces better, others handle background.
Things people often get wrong when using AI photo editors
This is where things go wrong for many users.
First, they over-enhance the photo. Too much sharpening makes it look fake.
Second, they expect AI to fix everything. If the image is extremely damaged, results will still have limits.
Third, they use the wrong tool. A general editor won’t fix faces as well as a specialized AI tool.
And sometimes, people ignore lighting. Even AI works better when the original image isn’t completely dark.
Free vs paid AI photo editors what actually matters
Free tools are good enough for most people. You can fix lighting, blur, and basic issues easily.
Paid tools usually offer:
- Higher resolution downloads
- No watermark
- Better face restoration
- Faster processing
But honestly, unless you’re editing professionally, free tools like Canva, Fotor, and Google Photos are enough.
What I’d personally use for quick photo fixing
If I just want fast results, I go with Google Photos or Canva. It’s simple and gets the job done.
If the photo is really blurry or important, then I switch to Remini. It handles faces much better.
That combination covers almost everything.
So what should you try first
If you’re confused, start simple.
Open Canva AI photo editor or Google Photos. Upload your image and hit enhance. See how it looks.
If the result still feels off, try Remini for sharper details.
That’s really all you need to get started. Once you try it once, it becomes second nature.
Muhammad Nawaz, tech guru & gaming aficionado. Your go-to for mobile news, gaming updates & expert blogging tips.